


This guide answers the attic questions Calgary homeowners ask most. Every answer follows the Canadian Home Builders’ Association (CHBA) Builders’ Manual, Chapter 12: Attics and Roofs, the building-science reference used by builders across Canada. Vertex Roofing & Exteriors Ltd., a Calgary roofing contractor operating since 2011, applies these same standards during roof repairs and replacements across the city.
The short version
- A Calgary attic performs well at RSI 7.0 (R-40) to RSI 10.5 (R-60) of insulation.
- The National Building Code requires unobstructed vent area of at least 1/300 of the insulated ceiling area — balanced between soffit intakes and ridge exhausts.
- Air sealing comes first: warm, moist indoor air leaking past the ceiling is what turns into attic frost, then into a “leak” during a chinook.
- Ice dams are a heat-loss problem, not a shingle problem — full-depth insulation over the top plates plus baffled airflow prevents them.
- Eave protection membrane is the backstop the code requires when a dam does form.
Tip: click any photo or diagram in this guide to enlarge it.
Jump to a section (20)
- 1.What a roof and attic assembly is
- 2.How much insulation a Calgary attic needs
- 3.What makes insulation effective
- 4.How moisture gets into an attic
- 5.How to air seal an attic ceiling
- 6.The National Building Code 1/300 rule
- 7.What proper ventilation does
- 8.Which roof vents suit Calgary snow
- 9.Ice damming and how to prevent it
- 10.Cracked ceiling corners (truss uplift)
- 11.Why ceiling drywall sags
- 12.Trusses that allow more insulation
- 13.Flat roofs: same controls?
- 14.Superinsulated attics & cathedral ceilings
- 15.Air barrier at partition walls
- 16.Sealing ceiling penetrations
- 17.Can a Calgary roof be unvented?
- 18.Underlayments for moisture control
- 19.Attic concepts, illustrated
- 20.Book an attic & roof inspection
What does a roof and attic assembly consist of?
A Canadian house roof usually consists of three parts: a ceiling assembly, an attic, and a roofing membrane. As with other components of the building envelope, the CHBA Builders’ Manual states that proper insulation values, air leakage control, and moisture control are essential.
How much insulation does a Calgary attic need?
A Calgary attic performs well with RSI 7.0 (R-40) to RSI 10.5 (R-60) of insulation. The CHBA Builders’ Manual lists this range as common for ceiling and roof systems, with Net Zero Energy builders on the high end of this range and beyond. Attic spaces are generally accessible and therefore relatively easy to insulate to high levels.
What makes attic insulation effective besides the R-value?
The quantity of insulation alone does not determine its effectiveness. According to the CHBA Builders’ Manual, overall performance of the roof and attic also depends on seven measures:
- Installing a wind barrier at the eaves to allow air movement but prevent wind from blowing through the insulation.
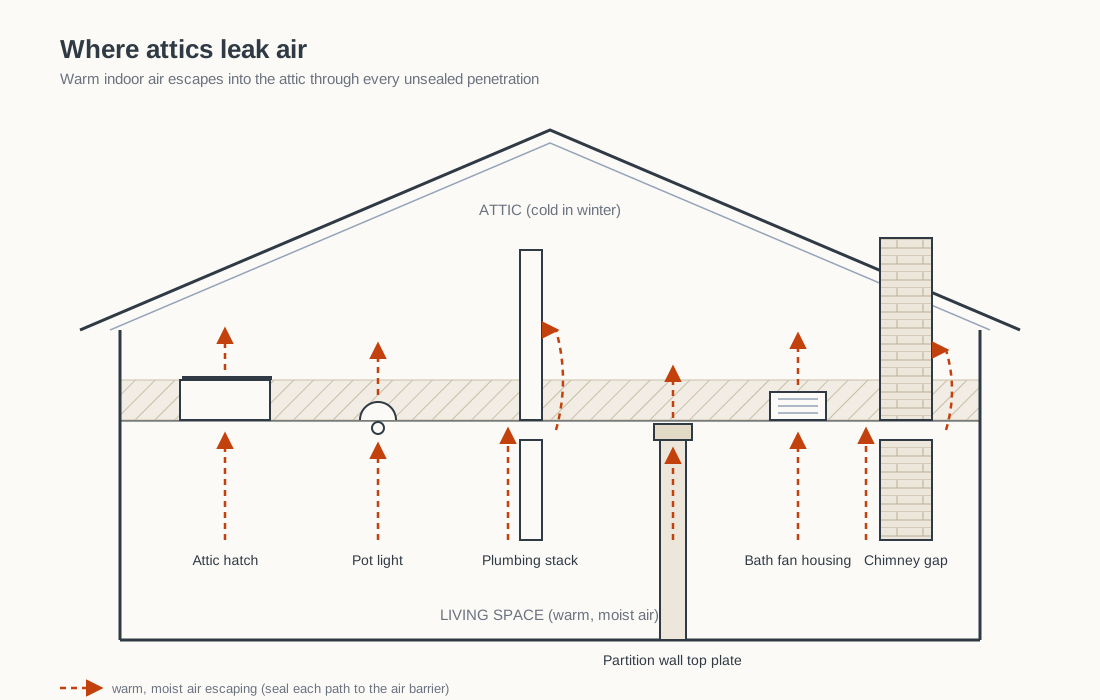
- Sealing ceiling joints and penetrations to restrict air leakage around plumbing stacks, electrical wiring, junction boxes, recessed light fixtures, partition wall top plates, chimneys, flues, and access hatches.
- Providing adequate and balanced attic ventilation.
- Exhausting bathroom fans to the exterior.
- Eliminating gaps in the insulation, particularly at truss webs.
- Maintaining full insulation thickness at the eaves. In no case should the amount of insulation over the top of the exterior walls be less than that of the exterior walls.
- Reducing thermal bridges through structural members.
How does moisture get into an attic?
Roof assemblies are vulnerable to moisture from three sources: rain penetration, water vapour entry, and ice damming. In addition to insulation, air leakage and moisture control are critical to ensure good roof performance and durability.
Water vapour enters the attic space in two ways:
- Warm, moist air from air leakage can be a major source of moisture movement from the living space to the attic, where it can condense on cold surfaces.
- Water vapour may diffuse into the attic through ceiling building materials.
Cold air cannot hold much water vapour. In cold temperatures, ventilation air may not be adequate to remove moisture that has moved into the attic space by air leakage or diffusion. The result is frost build-up in the attic space, which, when it melts, can damage wood framing, insulation, and drywall, and buckle the roof membrane as a result of sheathing movement.

How do you air seal an attic ceiling?
Air sealing minimizes the possibility of moisture accumulation in the attic space. Effective air and vapour barriers do this work, and the CHBA Builders’ Manual describes one option, a polyethylene air/vapour barrier installed on the warm side, in the following manner:
- Carry the polyethylene across the top plates of partition walls.
- Seal around chimney and ductwork using firestop materials.
- Seal around plumbing stacks and vents.
- Minimize ceiling-mounted electrical fixtures and penetrations in the ceiling. Where they are necessary, use airtight octagon boxes and lighting fixtures approved by the Canadian Standards Association (CSA) for insulated ceiling applications, and seal the units to create a continuous air barrier.
- Weatherstrip and latch attic access hatches, or place them on gable end walls outside the house.
- Seal electrical wiring and plumbing pipes where they penetrate through the ceiling or wall plates.
These measures reduce the passage of water vapour through a ceiling and into a roof structure. To account for leakage through any imperfections in the air or vapour barrier, the next line of defence is attic ventilation capable of removing moisture.
How much attic ventilation does the National Building Code require?
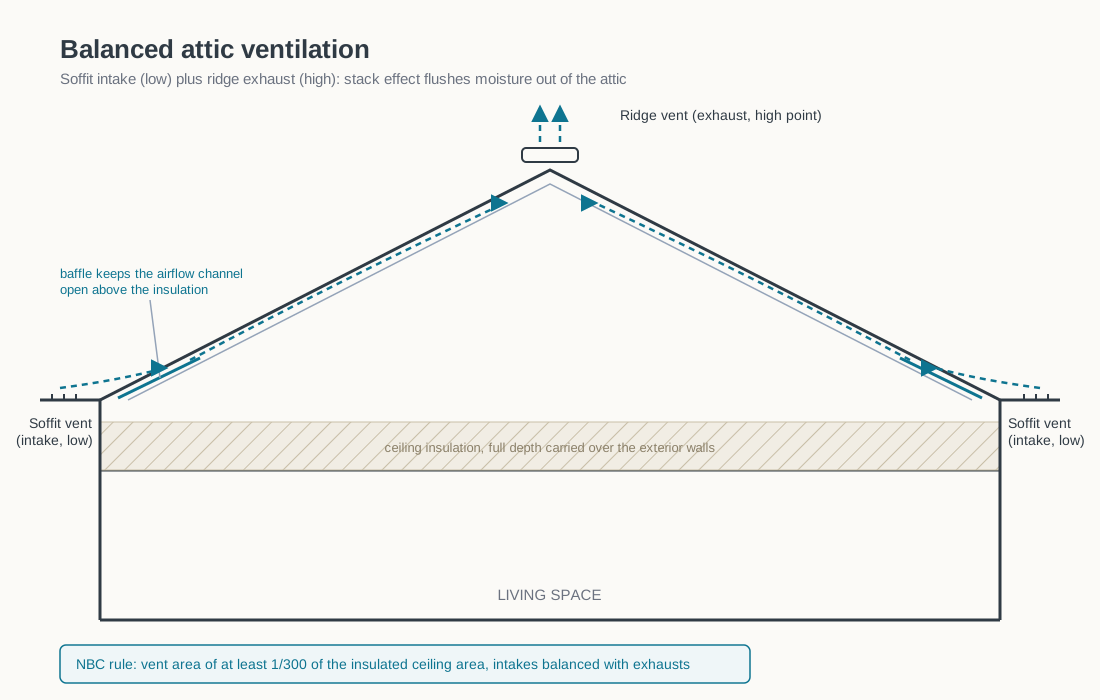
The National Building Code of Canada (NBC) requires the unobstructed vent area of a typical pitched roof to be not less than 1/300 of the insulated ceiling area. Warranties for asphalt shingles are also based on adequate ventilation.
Because the stack effect that moves air through the attic space is affected by the height between the eaves and the ridges, the amount of venting needs to be increased for flatter roofs, and can be decreased for steeper roofs. Screens and louvers obstruct the openings and must be taken into account when calculating the vent area.
The CHBA Builders’ Manual lists three other design considerations for roof ventilation:
- Maximize airflow by locating vents at eaves and soffits and near the peaks or along ridges.
- Increase the vent area on roofs with pitches less than 6/12.
- Balance the areas of vent intakes (low points) and exhausts (high points).
What does proper attic ventilation do for a roof?
Proper attic ventilation removes water vapour from the attic space before condensation can cause trouble, and it is essential for maximizing the service life of a roof assembly. Other benefits include a cooler attic in the summer and a dryer attic during the winter. Both result in increased energy savings and greater occupant comfort.
During the summer months, radiant heat from the sun can cause high roof-deck temperatures. Gradually, the entire attic space is heated, and, in turn, the whole dwelling feels the effect of a hot roof. Research cited by the CHBA shows that prolonged exposure to high heat levels shortens the service life of asphalt roofing products. Heat build-up can be reduced by properly venting the underside of the roof deck.
Which roof vents work best in a snowy climate like Calgary’s?
A balanced system works best: equally sized soffit vents and vents high on the ridge use stack effect to move air from the bottom to the top of the attic space. Louver and vent openings should be situated to allow ventilation when snow has accumulated on the roof, and baffles should be provided above the wall/ceiling intersection to allow room for air movement between the roof sheathing and insulation.
The CHBA Builders’ Manual compares the vent types this way:
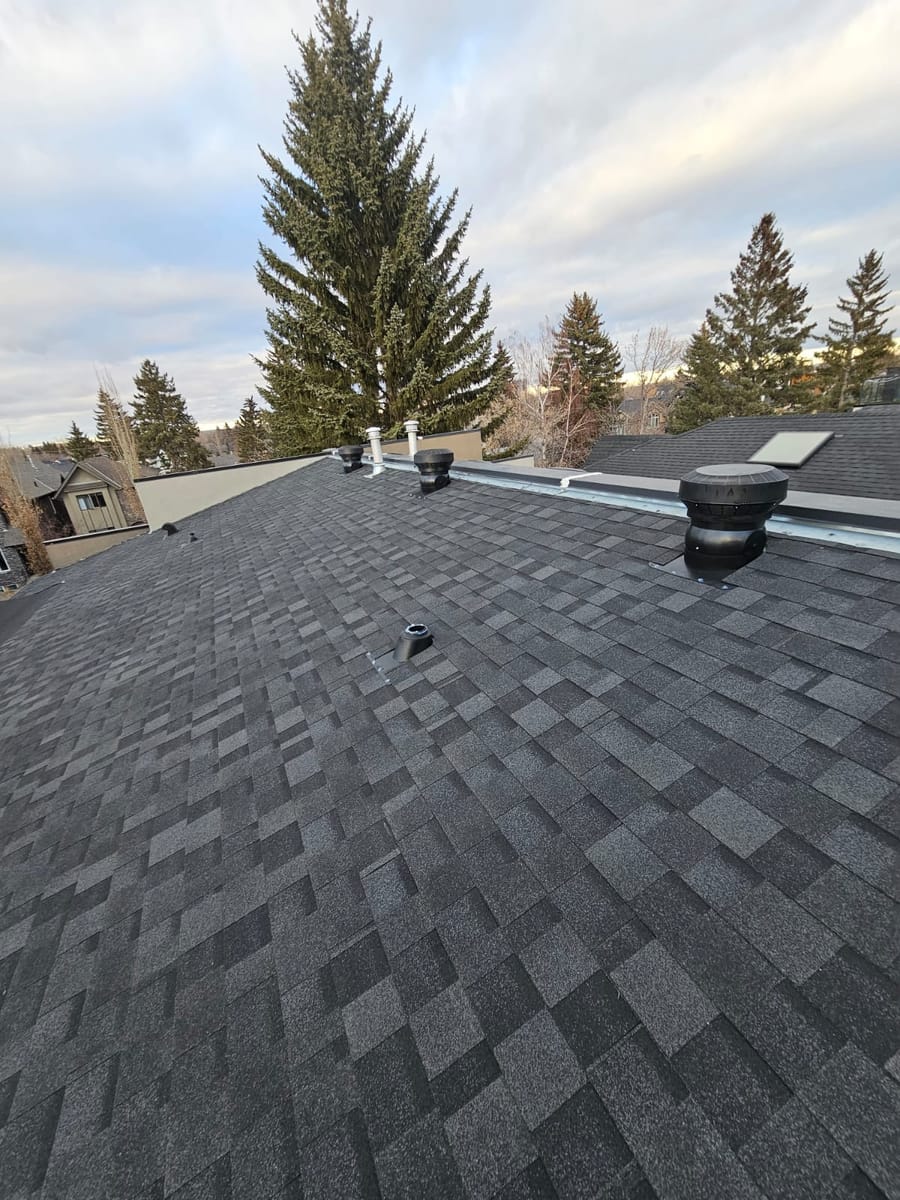
- Passive ventilators are low-profile vents like ridge-line ventilators and roof louvers. Unless wind direction conditions are ideal, passive ventilators do not freely promote airflow but merely allow air to disperse. This type of vent meets code requirements for area, but its performance is questionable because it is unable to exchange or replace attic air at a sufficient rate. Low-profile ridge vents are easily buried by snow, rendering the ventilation system inactive, and in windy conditions they provide little protection from rain or snow infiltration.
- Turbine-type or fixed deflector-type ventilators have a higher profile that allows them to function with some snow on the roof. The height creates additional stack effect to draw ventilation air from the soffit vents. In windy conditions, turbine-type ventilators can depressurize an attic space, which could potentially pull moist air from the heated spaces into the cold attic where condensation can occur. This highlights the need for a good air barrier.
- Power ventilators, while useful in the summer, should not be used in the winter. By creating negative pressure in the attic space, they could increase the flow of moist, warm air from the interior, and may suck snow into an attic.
Bathroom and kitchen mechanical vents should be vented to outside the roof, never into the attic.
What is ice damming, and how do you prevent it in Calgary?
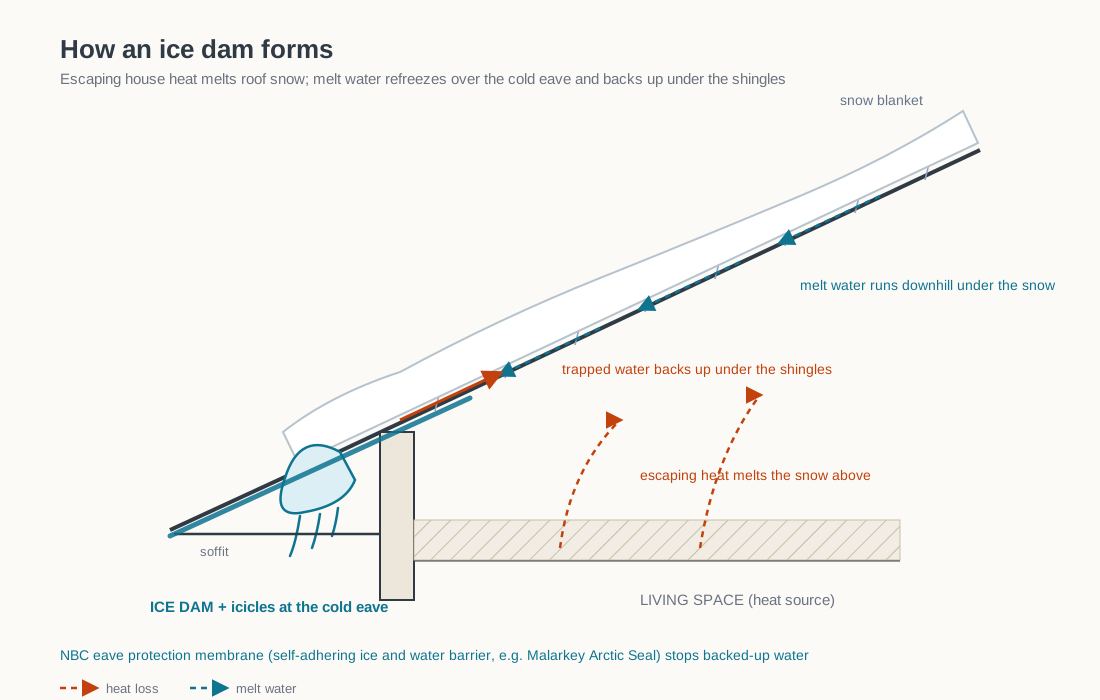
Ice damming is the build-up of ice at the edge of the roof caused by heat escaping from the house and melting the snow that accumulates on the roof. The melt water flows down under the snow covering the roof; as it reaches the outer edge of the eave over the cooler soffit area, it freezes, creating an ice dam. The ice dam stops the melt water from reaching the eave. Ice then builds up in the form of icicles and slabs, and the melt water can back up under the shingles and leak into the attic if adequate eave protection was not used.
The CHBA Builders’ Manual states ice damming can be prevented by:
- Maintaining adequate levels of insulation over the exterior wall in combination with ventilation between the insulation and roof sheathing.
- Minimizing heat loss due to air leakage at the ceiling/joist junction by providing a proper air barrier.
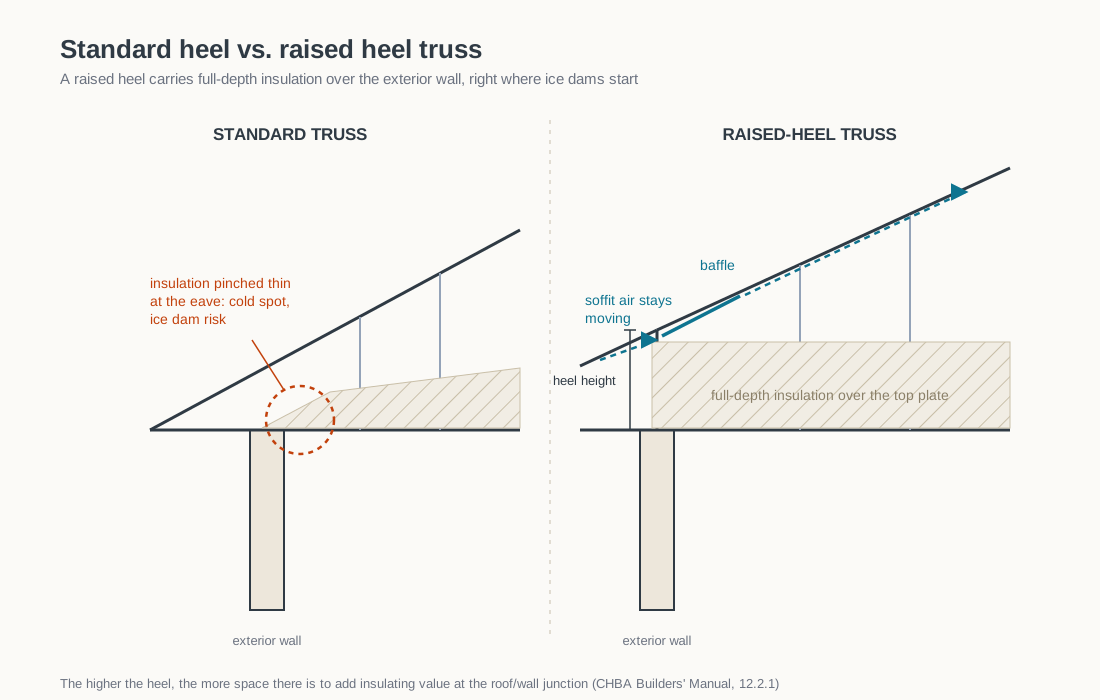
- Using raised-heel (also called “high heel”) trusses to allow for additional insulation over the exterior wall.
- Using prefabricated baffles to restrain the insulation and allow for airflow between the ceiling insulation and the underside of the roof sheathing.
The eave protection membrane required by the NBC provides additional protection if ice damming does occur. The insulation levels used for Net Zero Energy housing, when done correctly using high heel trusses, will eliminate this problem, leading to more durable, comfortable, and energy efficient housing.

Why do ceiling corners crack in winter? (Truss uplift)
Truss uplift can occur in the winter when the upper chord of a truss contains more moisture than the lower chord. This results from differing temperature conditions: the upper chords sit above the insulation, while the lower chords are insulated and thus at a warmer temperature. The upper chord, being at a higher relative humidity compared to the lower chord, expands by lengthening and bowing upward, pulling up the webs and the lower chord and causing the ceiling to move upward.
Truss uplift can damage interior finishes, particularly where the ceiling and interior partition walls join. The CHBA Builders’ Manual lists several ways to minimize the effects:
- Use half-span trusses supported on roof girders or interior load-bearing partitions.
- Use trusses manufactured with kiln-dried lumber and keep the trusses protected from wetting as much as possible during storage and installation.
- Ensure that the attic space is adequately ventilated and the vents provide balanced airflow.
- Ensure that soffit vents are not blocked by insulation.
- Connect the ceiling drywall to the partition walls using drywall clips, and screw the ceiling drywall far enough from the partition wall intersection, floating the corners at least 300 mm (12 in.) to allow for deflection without joint failure.
- Install 2 x 6 pieces to the top of partition walls and fasten the drywall to the lumber and not the trusses.
Why does ceiling drywall sag?
Ceiling drywall can sag because of four causes: absorption of water-based textured finishes by the drywall; high humidity from drying lumber and interior finishing materials; condensation on the drywall; and water damage caused by wind-driven rain and snow entering the attic or roof space.
These problems can be reduced or eliminated by:
- Using thicker drywall on ceilings (15.9 mm, or 5/8 in.) and controlled-density or sag-resistant drywall in place of regular gypsum board, or reduced spacing of supports, for example by strapping at 400 mm (16 in.).
- Preparing the surface with a compatible primer before applying heavy water-based textured finishes.
- Providing ample ventilation during construction.
- Preventing wind-driven rain and snow from entering the space.
- Insulating the ceiling immediately after installing the drywall and before heating commences.
- Ensuring installation of drywall sheets perpendicular to the strapping or framing to which they are attached.
Which roof trusses allow more attic insulation?
Engineered trusses that lift or drop a chord create room for full-depth insulation at the eaves, where standard trusses pinch the insulation thin. The CHBA Builders’ Manual notes there may be a small cost premium for these trusses compared to standard trusses, but they provide several roof performance advantages.
- Raised-heel truss: has a short, vertical chord member over the top plate bearing point that provides additional room for insulation over the wall/ceiling intersection. The higher the heel, the more space there is to add insulating value at the roof/wall junction. Advantage: a uniform thickness of insulation can usually be installed over the entire attic, including above the top plates. Disadvantages: the cost is higher than for standard trusses, and the design increases the height of the exterior stud wall, so the siding area increases.
- Cantilever truss: has a short, inclined chord member over the top plate bearing point, and the bottom chord projects to the eave. Whether there is adequate room for full-depth insulation over the wall/ceiling intersection depends on the length of the cantilever and the length of the chord.
- Dropped-chord truss: has an additional bottom chord. The space between the structural bottom chord of the truss and the dropped chord is filled with insulation.
- Scissor truss: has a sloped bottom chord and provides a cathedral ceiling without a supporting beam or wall at mid span. Advantages: free-spanning cathedral ceiling, higher insulation levels than a rafter cathedral ceiling, and full-depth insulation up to the perimeter walls. Disadvantages: less access room for installing insulation, baffles may be required to prevent settling of loose-fill insulation, and roof pitches are limited to 5:12 or more depending on snow loads.
- Parallel-chord truss: consists of parallel wood chords and steel or wood webs. Advantages: full-depth insulation in cathedral ceilings, and ventilation without purlins (transverse framing). Disadvantages: steel-web versions have higher heat loss due to thermal bridging, and the restricted height between chords may make insulating difficult.
Do flat roofs need the same insulation and ventilation controls?
Yes. Insulation, ventilation, and moisture vapour control are equally important for a flat roof as for pitched roofs, according to the CHBA Builders’ Manual. Flat roofs are used frequently in commercial construction and occasionally in residential construction. Built-up and flexible membrane roofing can be used, as can garden roofs that employ vegetation to reduce interior heat uptake and water runoff. Vinyl membranes suitable for residential flat roofs are also available.
Flat roof advantages: auxiliary use of roof space, rainwater harvesting, a variety of membrane options, and garden roofs. Disadvantages: limited space for insulation (at least some rigid insulation is required to provide R-values), at least twice as much roof vent area required compared to steeper roofs with attics, risks of moisture problems or thermal bridging, and higher structural loads if garden roofs are present.
What is a superinsulated attic or cathedral ceiling?
A superinsulated framed attic uses standard dimension lumber, with the ceiling joist extending beyond the top plate of the wall at the eaves to produce a triangular structure that can accommodate higher levels of insulation at the perimeter wall. The advantage: higher insulation levels above the top plate. The disadvantage: the superinsulated framed attic is more expensive to construct than a truss roof in most cases.
A framed cathedral ceiling uses dimension lumber with 38 x 286 mm (2 x 12 in.) rafters and 38 x 38 mm (2 x 2 in.) purlins. Two layers of RSI 3.5 (R-20) batts between the joists allow for adequate ventilation of the attic space. Where a cathedral ceiling creates living space in the attic, all attic spaces need to be ventilated. Costs can be lower than parallel-chord truss construction, but clear span is limited by the maximum size of dimensional lumber, insulation is limited to a maximum of RSI 7.0 (R-40) unless additional strapping and batt insulation or boardstock insulation is used, thermal bridging occurs through the rafter, and material and labour costs may increase.
How do you keep the air barrier continuous at partition walls?
Interior partition construction can greatly affect the energy efficiency of a ceiling, because a considerable quantity of air can move through the ceiling/partition wall junction. The CHBA Builders’ Manual describes two approaches:
- Sealed polyethylene approach (SPA): a 600 mm (24 in.) wide strip of 0.15 mm (6 mil) polyethylene is placed between the partition wall top plates. The polyethylene flange is sealed to the ceiling air barrier on either side of each partition before the ceiling drywall is installed.
- Airtight drywall approach (ADA): standard pre-cut wood or steel studs can be used for interior partitions if a 19 x 89 mm (1 x 4 in.) plate is placed on top of the exterior wall top plate. This raises the trusses enough to accommodate 16 mm (5/8 in.) drywall and allows the interior partition walls to be raised into a vertical position. The drywall can be taped before the interior partitions are raised. Cove moldings may be required to conceal truss uplift, and the method involves coordinating trades.
How do you seal ceiling penetrations: plumbing stacks, pot lights, ducts, and the attic hatch?
Ceiling penetrations between the living space and the attic must be carefully sealed to minimize airflow into the attic space. The CHBA Builders’ Manual covers each penetration type:
- Plumbing stacks: minimize the number of stacks that penetrate the ceiling by bringing vents together inside the envelope. Use an air- and vapour-tight flexible seal, such as a rubber membrane, where stacks penetrate the ceiling. The seal must be flexible, since plumbing stacks move from expansion, contraction, shrinkage, and settling of the house frame. One method passes the stack through a rubber gasket secured with a wood panel sheathing collar, with the hole cut 40 mm (1-1/2 in.) smaller than the stack diameter for a tight friction fit. An off-the-shelf neoprene rubber roof boot also works well and may be less expensive.
- Wiring and electrical boxes: seal wiring penetrations directly to the air barrier and top plate with expanding foam or acoustical sealant. Seal lighting fixture boxes by placing the device in a prefabricated polyethylene envelope, placing the box in a site-built wood box wrapped in 0.15 mm (6 mil) polyethylene, or using an airtight electrical box.
- Recessed lighting: where pot lights are required in the top-storey ceiling, use fixtures approved for direct contact with insulation materials. To create a continuous air barrier, it may be necessary to seal the fixtures with aluminium duct tape.
- Attic access hatch: seal the frame to the drywall, and weatherstrip, insulate, and latch the access door. This air barrier penetration can be eliminated by relocating the attic access to the garage or exterior gable.
- Ventilation and heating ducts: poorly sealed ducts running through unheated space are a major cause of heat loss and potential condensation problems. Seal ducts to the air barrier with caulking, and insulate over the ductwork to an RSI (R) value equal to that found elsewhere in the attic.
- Bathroom fans: a bathroom is a high-humidity area, and the fan housing needs to be airtight. Install insulation over the fan housing, select a cool-running motor approved for insulated housings, seal the duct joints, insulate the duct, and connect it to a good quality metal roof exhaust hood extending at least 130 mm (5 in.) above the roof surface.
- Chimneys: seal around prefabricated metal and masonry chimneys with a two-piece firestop and non-combustible sealant.
- Pest screening: birds and rodents can damage roof and wall insulation, electrical wiring, and plastic roof vents. Screen all penetrations of the roof deck and soffits, and use vent caps that cannot be chewed.

Can a Calgary roof be unvented?
Building codes require ventilation of the attic/roof space. Ventilation helps exhaust any moisture or water vapour that may enter the space and keeps the attic/roof space cooler in summer. The most effective technique uses a continuous soffit ventilation strip, continuous ridge vents at the roof edge, and roof ventilators equally spaced near the ridge.
However, in northern regions where fine blowing snow is common, local authorities may approve unvented attic/roof spaces. An unvented (hot) roof has no ventilation in the roof or attic space, and the CHBA Builders’ Manual states it should be used only if:
- The roof is tightly constructed to prevent the entry of fine, blowing snow.
- Heat loss and moisture transfer through the ceiling are minimized by proper air leakage control and an adequate layer of insulation extending over the top plates at the wall/ceiling intersection.
- Snow is not allowed to accumulate on the roof: either the wind must blow it off, requiring an average annual wind speed of 16 km/h (10 mph), or the occupants must remove it.
The NBC permits an unvented roof as a special exemption where it can be shown that venting is unnecessary. Careful construction is required, particularly with regard to the air and vapour barriers, to ensure moisture does not get into the attic space. In a typical unvented roof, rigid foam insulation sits above the sheathing on the top chord of the truss or rafter. Structural Insulated Panels (SIPs) may be another solution, providing the required insulation as well as the air barrier and vapour barrier qualities needed.

Which underlayments support attic moisture control on a Calgary roof?
The CHBA manual’s drying principle is simple: keep external moisture out, and let the assembly dry. Vertex matches Malarkey underlayments to that principle by roof type:
- Malarkey Arctic Seal: self-adhering ice and water barrier, 65 mil NEX polymer modified asphalt, ASTM D1970 tested. It serves as the NBC eave protection membrane at eaves, valleys, and transitions, and Malarkey engineers it to help prevent leaks caused by ice dams.
- Secure Start Lite: lightweight four-layer synthetic underlayment, 3x lighter than felt paper. It is Malarkey’s most economical underlayment option and works under asphalt shingles, wood shakes, metal, slate, and tile.
- Secure Start Plus: five-layer polyolefin underlayment with anti-skid texture, rated for 90 days of direct UV exposure, Class A fire rated with a 10-year product warranty.
- Secure Start Permeable: 32 mil vapour-permeable underlayment that allows internal moisture to escape while keeping external moisture out. This matches the manual’s requirement that an attic assembly be able to dry.
- Right Start UDL: 50 mil mechanically fastened NEX polymer modified asphalt underlayment, suited to tile and heavier roof installations.
- Secure Start HT: 48 mil high-temperature self-adhering membrane rated to 250 F, built for metal roofs in climates with high winds, ice dam risk, and wind-driven rain.
Vertex pairs these underlayments with Malarkey Class 4 impact-resistant shingles on hail-prone Calgary roofs, where impact resistance earns its cost fastest.

Attic concepts, illustrated
The four diagrams below explain the chapter’s core concepts at a glance.
Book an attic and roof inspection in Calgary
An attic inspection finds the frost, the blocked baffles, and the unsealed penetrations before they become ceiling stains. Vertex Roofing & Exteriors has served Calgary, Airdrie, and Okotoks since 2011, is WCB covered and fully insured, and backs its work with a 10-year workmanship warranty. Contact Vertex to schedule an inspection.
Frost in the attic, icicles at the eaves, or a stain that only shows up during a chinook? Gazi will inspect the attic and the roof together and tell you which of the three controls failed.
Sources
Canadian Home Builders’ Association (CHBA) Builders’ Manual, Chapter 12: Attics and Roofs, pp. 243–259; National Building Code of Canada (attic ventilation and eave protection requirements referenced within the manual); Malarkey Roofing Products technical pages for Arctic Seal, Secure Start Lite, Secure Start Plus, Secure Start Permeable, Secure Start HT, and Right Start UDL.
Where Vertex applies this work
Roof & leak repair
Ice dam removal, attic insulation upgrades, and ventilation corrections in one visit.
Hail roofing
Class 4 impact-resistant shingles paired with Malarkey underlayments.
Flat roofing
TPO, EPDM, and SBS systems where vent area and rigid insulation matter most.
Skylight repair
Reflashing and resealing Velux and Columbia units at the air barrier.